In this ever-changing world of business, Agility and scalability are very important. That is why it is a good idea for Odoo – a powerful open source ERP software – to combine with AWS, which is a renowned cloud service provider, together to create a winning combination.
This blog will explore the compelling reasons why deploying Odoo on AWS is the perfect choice for businesses of all sizes and also give a step-by-step guide to setting up Odoo on AWS.
Why Deploy (Open source ERP) Odoo on AWS?
- Unparalleled Scalability: Your Odoo instance can grow with your business because the AWS infrastructure enables scaling resources effortlessly thus making sure that your system caters to what you will need in future.
- Cutting IT expenses: AWS requires payment for the resources you utilize only. Erase the initial pay-out of on-site infrastructure and take advantage of a pay-as-you-go pricing plan.
- Enhanced Security: Amazon Web Services puts safety first with strong measures that ensure that your data is protected. Feel secure because your Odoo instance is secure and complies with industry laws.
- Global Reach: Deploy your Odoo in any of AWS’s numerous data centers worldwide. This optimizes performance for geographically dispersed teams and customers.
- Focus on Your Core Business: By leveraging AWS for Odoo deployment, your IT team can focus on strategic initiatives instead of server maintenance.
Also Read: Steps to install Odoo 16 on Windows
A Step-by-Step Guide to set up Odoo on AWS
Pre-installation Requirements
Before you begin setting up Odoo on AWS, ensure you have the following:
- An AWS account
- Basic knowledge of AWS services (EC2, RDS, S3, etc.)
- Familiarity with Odoo and its requirements
1st Step: Launch an EC2 Instance
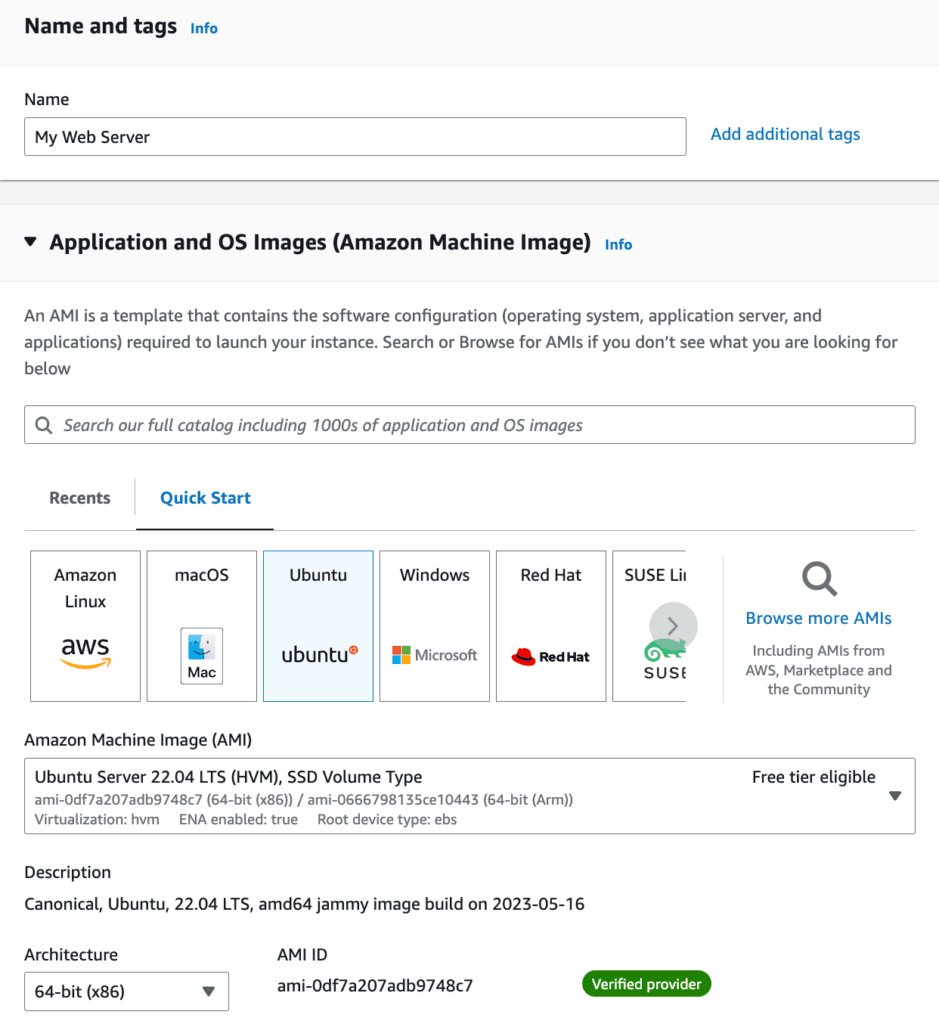
- Choose an Amazon Machine Image (AMI)
- Log in to your AWS Management Console.
- Navigate to the EC2 Dashboard.
- Click on “Launch Instance.”
- Select an Amazon Machine Image (AMI). For this guide, we recommend using the Ubuntu Server 22.04 LTS AMI.

- Choose an Instance Type
- Make your choice of the instance type depending on your demands. If deployment will be kept on a smaller scale, t2.medium instance would do. Otherwise, you should take into account m5.large or larger instance types for bigger deployments.
- Click “Next: Configure Instance Details.
- Configure Instance Details
- Configure your instance settings as needed. Ensure you set the number of instances to 1 and leave the other settings as default.
- Click “Next: Add Storage.
- Add Storage
- Allocate storage for your instance. A minimum of 20GB SSD is recommended for small to medium deployments.
- Click “Next: Add Tags.
- Add Tags
- You can add any necessary tags for organization and management. You can add a tag for instance, with the key “Name” and value “Odoo Server.”
- Click “Next: Configure Security Group.
- Configuring Security Groups
Configure security groups to control inbound and outbound traffic to your instance. Create a new security group with the following rules:
- Allow SSH access (port 22) from your IP address.
- Allow HTTP access (port 80) from anywhere.
- Allow HTTPS access (port 443) from anywhere.
These rules ensure secure access to your instance and the Odoo web interface.

- Review and Launch:
- Check all the settings for your instance first then click on the “Launch” button.
- Either you can choose an existing key pair for SSH access or generate a new one.
- Click the “Launch Instances” option.
2nd Step: Install Dependencies
- Connect to Your EC2 Instance
- Open your terminal or SSH client.
- Connect to your EC2 instance using the following command: ssh -i /path/to/your-key.pem ubuntu@your-ec2-public-dns
- Update the System
- Update the package lists and upgrade the system:
- sudo apt update
- sudo apt upgrade -y
- Install Required Packages
- Install Python, pip, and other required packages:
- sudo apt install python3-pip build-essential wget git python3-dev libxml2-dev libxslt1-dev zlib1g-dev libsasl2-dev libldap2-dev libssl-dev libjpeg-dev libpq-dev libjpeg8-dev liblcms2-dev libblas-dev libatlas-base-dev -y
- Install PostgreSQL
- Install PostgreSQL:
- sudo apt install postgresql -y
- Create a PostgreSQL user for Odoo:
- sudo su – postgres
- createuser –createdb –username postgres –no-createrole –no-superuser –pwprompt odoo
- exit
3rd Step: Install Odoo
- Download Odoo Source Code
- Clone the Odoo repository from GitHub:
- sudo git clone https://github.com/odoo/odoo.git /opt/odoo
- cd /opt/odoo
- Install Python Dependencies
- Install the required Python packages using pip:
- sudo pip3 install -r requirements.txt
- Configure Odoo
- Create a configuration file for Odoo:
- sudo nano /etc/odoo.conf
- Add the following configuration settings:
- admin_passwd = your_admin_password
- db_host = False
- db_port = False
- db_user = odoo
- db_password = your_db_password
- addons_path = /opt/odoo/addons
- logfile = /var/log/odoo/odoo.log
- Install Wkhtmltopdf
- Download and install wkhtmltopdf for PDF rendering:
- Wget https://github.com/wkhtmltopdf/packaging/releases/download/0.12.6-1/wkhtmltox_0.12.6-1.bionic_amd64.deb
- sudo apt install ./wkhtmltox_0.12.6-1.bionic_amd64.deb
- Start Odoo
- Start the Odoo server:
- /opt/odoo/odoo-bin -c /etc/odoo.conf
4th Step: Access Odoo
- Open your web browser and navigate to your EC2 instance’s public DNS or IP address
- http://your-ec2-public-dns:8069
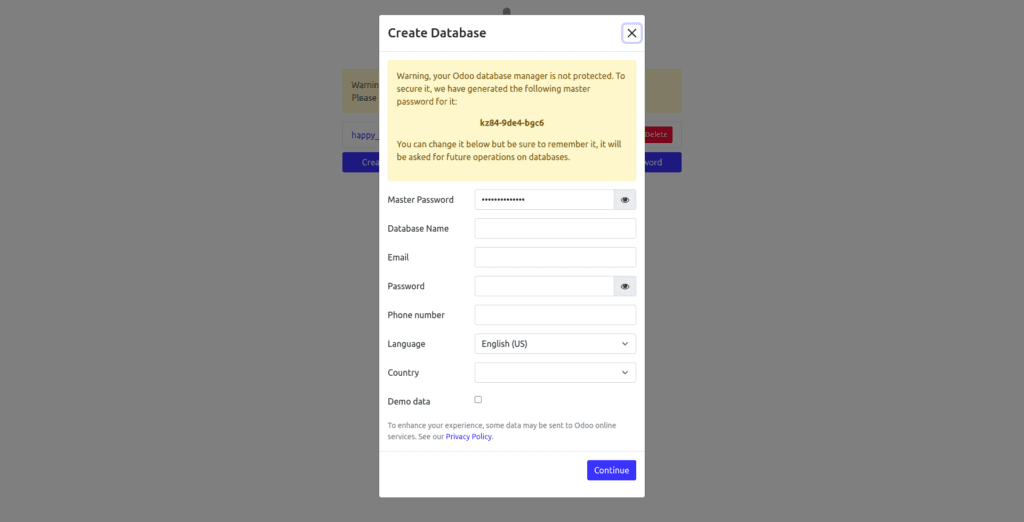
2. You should see the Odoo setup screen. Follow the instructions to complete the initial configuration.

Finally, you have successfully set up Odoo on AWS. But if you are still facing some issues during the process seek expert guidance. We have expert consultants who can guide you along the way. Feel Free to reach out to us.
Also Check Out:
- Tips to choose the right ERP software for your business in 2024.
- Odoo Server hardware requirement guide
In Crux to deploy Odoo on AWS follow these steps
- Create an AWS account: If you don’t have one already, sign up for an AWS account.
- Launch an EC2 Instance: Choose an appropriate EC2 instance type based on your expected workload.
- Install Odoo: Use the package manager (e.g., apt-get or yum) to install the latest Odoo version on the EC2 instance.
- Configure Odoo: Set up the Odoo database, administrator credentials, and other necessary configurations.
- Access Odoo: Use the public IP address of your EC2 instance to access the Odoo web interface.
Final Marks
The setup of Odoo feels much like putting in place a good foundation upon which your ERP system could grow; a reliable, secure and scalable environment is guaranteed on AWS. With the help of this guide, it is very easy to deploy Odoo on AWS quickly so as to start managing business processes more efficiently. Your company will run smoothly through the strong infrastructure of AWS and effective functionalities provided by Odoo. If additional help is needed, you should get in touch with a specialist who understands the two systems well, for example an expert in AWS or an Odoo consultant.


